
Many might be fooled into thinking the Face Pull is just another easy corrective exercise. The fact is it’s a versatile exercise that can be programmed as part of your dynamic warm-up or as part of your upper body strength routine.
Face Pulls primarily work the rear deltoids (shoulders), rhomboids and the external rotators (infraspinatus and teres minor). Keeping these muscles strong and conditioned is extremely important. Especially for those that do a lot of pressing-type exercises like push-ups, bench press and overhead press.
The main reason I’m a big fan of the face pull and why I incorporate it into all of my client programs is because it is the perfect remedy for poor shoulder positioning. Just take some time and look at the profile of people around you. Most people that sit all day who are constantly looking down at their phone, in front of a computer, or watch a lot of TV have a tendency to have slouchy shoulders and poor posture.
The muscles that pull the shoulders back (scapular retractors) and the muscles that help us sit up straight (thoracic extensors) get tired, lazy and weak from inactivity and putting our bodies into some awful positions. Over time, your shoulders can roll forward and you’ll inevitably lose mobility. And may develop some type of pain through the shoulders (pinching feeling when reaching overhead, an achy feeling after doing a set of push-ups, range of motion problems when reaching your arm behind you).
Many people brush this type of pain off as old age or too much time spent in the weight room. However, by adding face pulls into your exercise program you can save your shoulders and get them to function the way they’re meant to.
What You’ll Need to Get Started:
There are a couple different equipment options when doing Face Pulls. The first is your basic pulley system that you’ll find in most gyms. Set the adjustable pulley at upper chest height to get the best angle for performing the movement. The second option is a resistance band or rubber tubing. These are easy to use, great to travel with, inexpensive and can be used in a variety of ways.
How To Do a Face Pull:
Set the cable or band up at chest to face height. If using a band or tubing, be sure to securely wrap it around a post, squat rack or other stable anchor point. We actually have handicap bars all around our facility secured into the wall. They make an ideal attachment point for bands and tubes. We also have adjustable cables attached to a weight stack. Both work well, so feel free to use whatever option is most convenient for you and your workout environment.
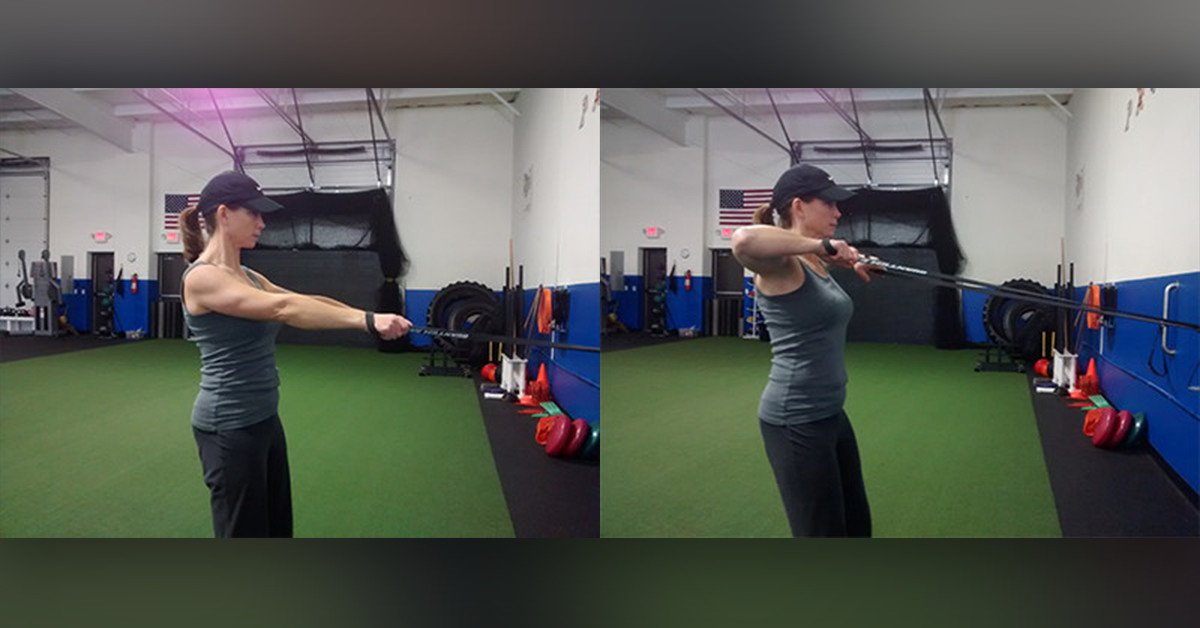
Begin the movement with your arms fully extended to the front and your hands in a pronated (palms down) grip. As you pull your hands back toward your face, be sure to keep your elbows elevated so they remain in-line with your shoulders throughout the movement.

Face Pull Starting Position
Focus on keeping the chin tucked and do not allow your neck to reach forward (turtle neck). If you find this happening, you might be using too much resistance.
You’ll also need to focus on your shoulder blades retracting (pulling in toward your spine) as you perform the pulling motion.

Face Pull Concentric
Control the movement on both the concentric (pulling) phase and the eccentric (release) phase. As you master the motion, you can feel it even more by adding an isometric hold at the end of the pull phase. Focus on keeping those shoulder blades pulled in as you hold it for a few seconds and then slowly release back into the starting position.
Here are a few key points to focus on when performing the Face Pull:
- Focus on pulling to the chin or neck area.
- When pulling back, spread the hands apart a bit and add the isometric hold.
- Be sure to squeeze to tighten you abdominal area and squeeze your glutes.
- Breathe out as you pull back.
- Don’t let this be an ego exercise…use a resistance level that allows for perfect form.
- Perform 3-4 sets of 8-12 quality reps as part of your warm-up and/or as part of your upper body workout.
- Have someone watch you from the side to assure you keep good alignment with the chin tucked. Do not rock the body or arch the back.
- If you find it too hard to keep good posture while standing, try doing them in a lunge stance or ½ kneeling position. Just be sure to do equal amounts on both sides.

Face Pull Kneeling Stance

Face Pull Lunge Stance
About the writer: Ken Grall is a Certified Strength & Conditioning Specialist (CSCS) and owns and operates an Edge Fitness in Madison, Wisconsin. Learn more about Ken.
Leave a Reply