
Next up in my “Awesome Exercises You Need to be Doing” series is the Hip Hinge. While the hip hinge is considered one of the more basic movement patterns, it’s also one of the most difficult for people to master. But very few movements can offer as much as the hip hinge in terms of overall movement quality, addressing pain (especially low back pain) to keep the body injury-free, and making sure the body is primed to properly perform the “popular” exercises such as deadlifts, squats, and swings.
What is a Hip Hinge?
The hinge involves a flexion/extension movement that originates in the hips and involves a posterior weight shift. When done correctly, it can be one of the more powerful movement patterns you can perform.
Often considered one of the primal movement patterns (one that we are all physiologically designed to execute with ease), the hip hinge offers many benefits:
- It opens up hamstring flexibility and offers mobility through the hip joint
- Builds symmetry and reduces injury
- Shortens the learning curve when introducing more complex movements/exercises
- Serves as a great assessment to diagnose flexibility/mobility issues as well as a weak or unstable core area
- Is great for un-doing some of the damage that prolonged sitting can do to the body
Unfortunately, many people have no concept on how to hinge properly or disregard the movement as unnecessary because of it looks too “simple.”
But, as legendary strength coach and author Dan John said, “The truth is, the hinge, in its own right, is more powerful than the squat.”
How To Hip Hinge:
The first thing to understand is the difference between a hinge and a squat:
- Squat: Maximal knee bend and maximal hip bend
- Hinge: Minimal knee bend and maximal hip bend
When first learning the hip hinge, most people will want to bend at the knees when, in fact, they need to simply focus on pushing the butt back.
Easier said than done as many people who struggle with proper form on the hip hinge have already lost the mobility and flexibility required to pull off this simple move.
So let’s first begin with the simplest form of a hip hinge and show you how to progressively advance the movement…..

The Wall Tap Hip Hinge
Begin by standing tall with feet about shoulder-width apart. Keep your chest up, shoulder blades retracted in toward the spine and head up and facing forward.
I like to have people “feel the hinge” by placing their hands palms-up and gently pressing on the crease of the hip flexors just below the hip bone.
Brace the abs and focus on moving (hinging) the hips back until your butt touches the wall. You should actually feel the hips fold down on the hands as you hinge forward and remember, there should be very little bend in the knees!
Start as close to the wall as needed (I usually start new people about 6-8” away) and as you become more comfortable with your hinge you can slowly move further away from the wall.
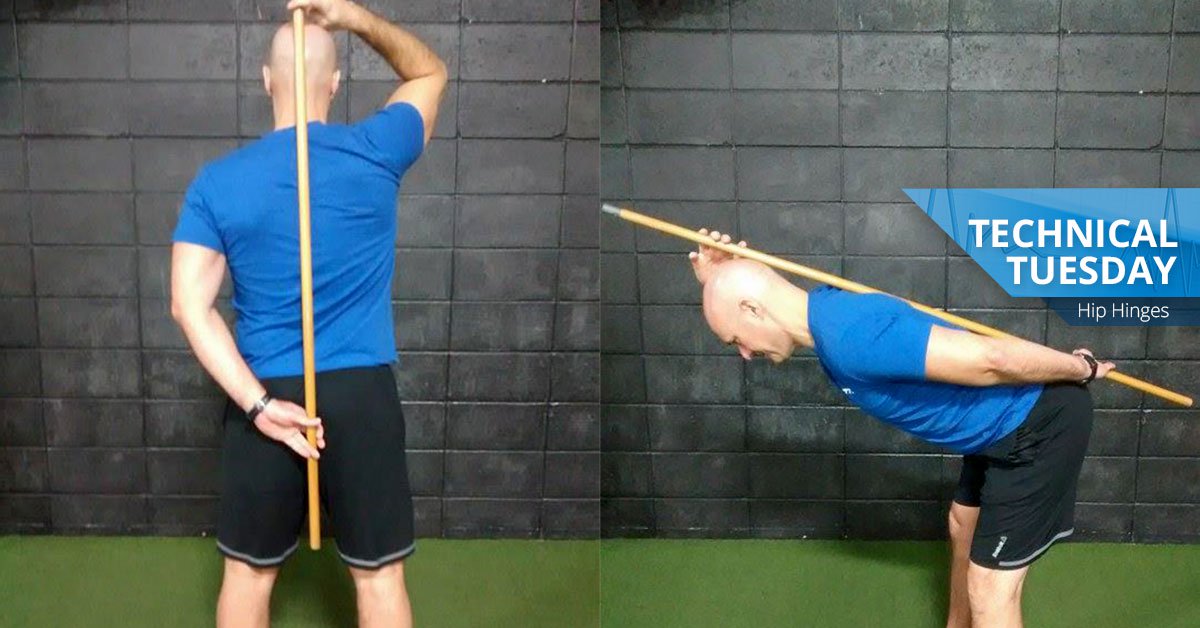
Dowel Hip Hinge

This is a nice variation on the hinge because the dowel will provide instant feedback to help determine if you’re performing it correctly.
Hold the dowel behind you with it touching 3 areas…the sacrum (just below the low back), between the shoulder blades, and directly behind the head.
If you lose contact with any of these 3 points then you know there is a flaw in your hinge and you should run through the basics of the hinge to correct it.
Sternum Hip Hinge

In this variation of the hinge you’ll place a kettlebell, weight plate or a sandbag onto your chest (hug it into your chest) over the sternum and upper abs area.
The anterior load from the weight will add a new dimension to the hinge and you really should feel the movement a whole lot more. If you feel those hamstrings firing, you’re more than likely doing this one right!
Band Resisted Hip Hinge

This is one of my favorites because it really makes you finish the move and puts a nice focus on the glutes. Plus, with the band wanting to pull you back, it forces you to stabilize through your mid-section and control the movement.
Simply attach a flat-looped resistance band around a bar at waist height and then get inside with the band sitting at hip level. You don’t need a ton of resistance in the band, just enough to feel it wanting to pull you back a bit.
Hip Hinge Tips:
- Remember, proper form is king on the hip hinge. Have someone well versed in proper form watch you or even record yourself doing them so you can see your form.
- Use the hinge as a guide before jumping into kettlebell training or complex barbell lifts. Master the basics before moving on!
- If you sit a lot during the day, find time to get up a few times through the day and perform some basic hinges.
- Don’t think of the hinge as a slow stretch or movement …snap through at the top using the hips and glutes.
- Do not round your back….shoulder blades in toward the spine.
- Remember, it’s not a squat so bend minimally at the knees and push your butt back!
- Hip Hinges are great as part of a warm-up or as part of your workout. Shoot for around 3-4 sets of 15-20 hinges.
About the writer: Ken Grall is a Certified Strength & Conditioning Specialist (CSCS) and owns and operates an Edge Fitness in Madison, Wisconsin. Learn more about Ken.